Saturday, August 28, 2010

Piping Hot Binding

Sometime ago now, a friend gave me the book "Piping Hot Binding" by Susan Cleveland.  The book describes in detail how to make and apply piping in the binding of a quilt.


I have now made a number of quilts where I have finished them with piping in the binding and love the result - it makes for a quilt with a distinctive touch to the finish and frames the quilt beautifully.  I have found that it works really well with quilts which have either solid fabrics or solid borders - it is important that the piping fabric is in high contrast to the outer border and binding.

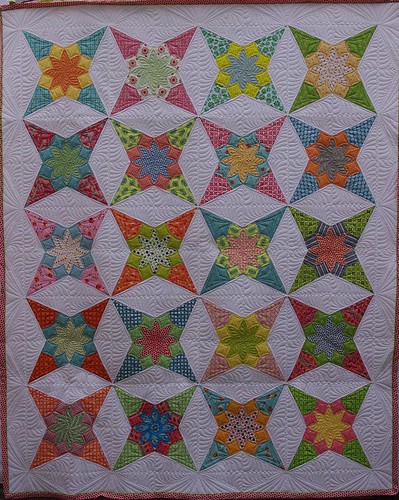
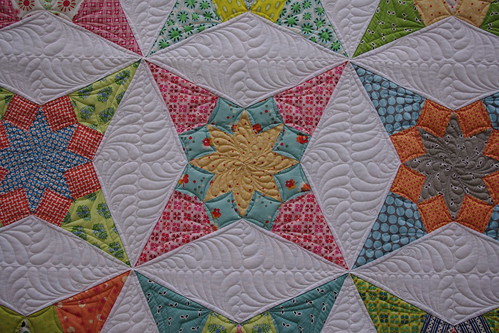
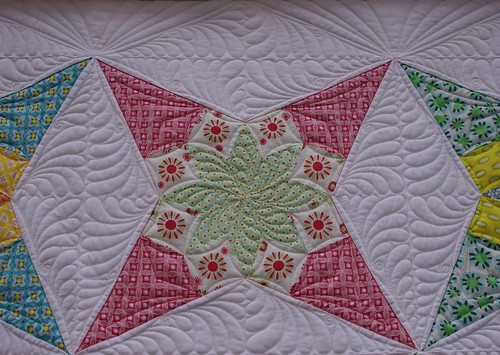
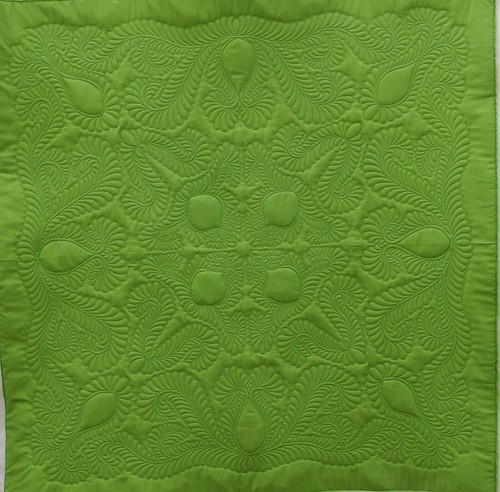
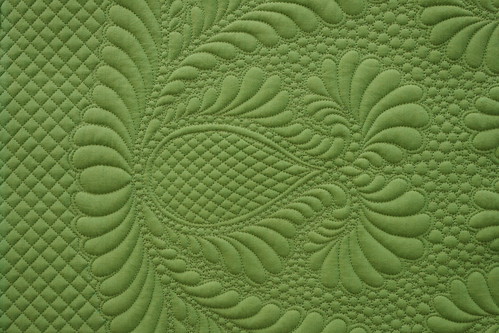
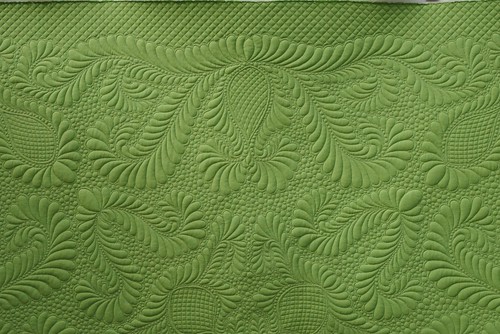
Following are some close-ups of some of the quilts where I have included piping in the binding.

King David's Modern Crown Quilt

Crop Circles Quilt (top)

Zigue Zague Quilt

The book describes in great detail how to make and apply the binding.  Susan Cleland has also created the Groovin' Piping Trimming Tool which is used to trim piping seam allowances to a consistent width.  The procedure is not difficult, although it is time consuming - it takes me twice as long as applying binding alone, however, I think it is well worth the effort.  The book also describes a number of variations such as double piping, blanket stitch on piping and pieced piping.  I have not yet been adventurous enough to tackle these variations.

How do you like to finish your quilts?

Sunday, August 22, 2010

Dad Saves the Day

This week my quilting machine had a major break-down for the first time ever.  I hardly ever have quilts with a definite deadline but, of course, this time I did.  I was stitching along one evening early in the week in stitch regulated mode when all of a sudden the machine's speed picked up to the point of sewing uncontrollably fast.  Eventually, the machine would sew at full speed from the second it was turned on and would not turn off with the switch on the handle.

Bruce Brown, the Australian Gammill guru from The Finishing Touch, who unfortunately lives interstate, advised that I had blown my speed control transistor which would need to be replaced - this sounded serious!  Bruce put a part in the mail for me and talked me through the instructions for replacing it.  The part was a very small electronic component which lives under the motherboard and would require soldering in.  I certainly can't solder, nor can my husband.  Who to ask but my handy father....  My dad is a retired tiler but is generally a very handy person who has turned his hand to many trades.  While he has done some soldering before, he had never worked with electronic components.

Friday morning, Dad and I opened up the quilting machine and were faced with the very scary inside of the machine - wires and plugs everywhere.


After carefully numbering all the plugs, we unplugged them, unscrewed the motherboard and found the part to be replaced.  The replacement part was only about 3/4 inch in size with three prongs which required soldering onto three wires - work much finer than Dad is used to.  Together we did manage to solder the wires on, re-attach the motherboard, plug the numerous wires back in and put the cover back on.  We both held our breath as we turned the machine back on.  The first signs were good - at least it didn't start stitching uncontrollably as soon as I turned it on.  After some testing all apeared well - we had done it!  We must have even put the plugs back on in the correct positions.

The quilt with a deadline was finished over the weekend and has already been collected by my customer Linda from Quilts in the Barn.  Linda has made a stunning Dresden Plate Quilt which I have quilted with lots of feathers.  The quilt is going to be published as a pattern in an Australian magazine later this year so I can't show you the whole quilt as yet.  Here is a little sample - I will show the whole quilt once the magazine is out.


So, thanks Dad for a great repair job, Bruce for wonderful instructions and Linda for your patience in waiting for the quilt to be finished.  I am looking forward to a less eventful week.

Friday, August 13, 2010

Baby Quilts

I have just quilted three gorgeous baby quilts for my customer Hilary.  All three babies are yet to be born.  The quilts look just beautiful together and I am sure they will be treasured by their new owners.  These quilts don't really need much explanation - I think the pictures speak for themselves.  Enjoy!


Thursday, July 22, 2010

A Ribbon for King David's Modern Crown Quilt

Today I went to the Craft Fair in Melbourne - a fabulous day made all the more enjoyable as a result of one of my quilts winning a ribbon.  I had entered my Kind David's Modern Crown Quilt in the Longarm section of the Vic Quilters 2010 Showcase and was absolutely thrilled with the Runners Up ribbon.


The quilt is my version of the King David's Crown Quilt by Michelle Yeo - rather than using reproduction fabrics, I have used fresh, modern fabrics with a white background fabric so that the quilting could be a feature.


The machine quilting was inspired by Sharon Schamber.  Sharon is a renowned quilter and I was fortunate enough to do a workshop with her last year.  I took the unquilted King David's Crown Quilt top along to the class and Sharon assisted in the quilting design stage.


I have extended the quilting in the diamonds into the border of the quilt.


I would like to thank Victorian Quilters Inc, the organisers of Quilt Showcase 2010 for putting on a wonderful Quilt Exhibition.  I would also like to thank the generous sponsors of the Longarm catergory including Horsham Patchwork Quilters Inc., Patchers & Quilters of the Hay Plains, Mini Jumbuck and Victoria Can Do Books. 

Friday, July 16, 2010

Home & Finished Wholecloth called "Envy"

We have returned from our trip to Europe and have had a fabulous time.  It is great to be home again and we are settling back into our usual routine.  I have started quilting again, however, at this stage I would like to share a quilt I finished just before we went overseas.

In April this year I took part in the online Wholecloth Design and Execution Course through MQ Resource.  I have previously blogged the design stage of my quilt which can be seen here.

Having completed my customer quilts before travelling overseas, I took some time to mark and quilt my wholecloth quilt.  I wanted a quilt which wasn't going to blend into my walls at home and therefore chose a bright green shot cotton by Kaffe Fassett.

The marking stage proved a huge task - each motif had to be traced in blue marker on to the quilt top.  I was excited to learn, however, that I would not need to buy a light box.  A trip to our local hardware store for the purchase of a sheet of perspex and, together with some kitchen chairs and a desk lamp, I was set.


Having marked the quilt I wasn't going to quilt it straight away.  However, I found that after a few weeks the blue lines were starting to fade.  I didn't want the time I had spent marking to have been wasted so onto the frame the quilt went.

I used 2 layers of wadding - 1 layer of Nu-wool wadding which is a mix of 60% wool and 40% poly and 1 layer of Matilda's Own 100% Cotton.  The thread I used was Aurifil 50wt which quilted beautifully - it has a lovely sheen to it.

Initially I quilted all the motifs which didn't prove as difficult as I had anticipated.  Having quilted all the motifs I removed the quilt and removed the blue marker pen with water.


The quilt then went back on to complete the border with cross-hatching, curved cross-hatching in the centre of the motifs, pebbles in the spines and lots of pebbles for the background quilting.  I think I found the back-ground quilting the hardest part - pebbles do take a lot of time to quilt but I do love the end result.


Here are some close-ups of some of the motifs:-


I am thrilled with the end result of my little "Envy" Wholecloth Quilt - the course was wonderful, I learned a lot and enjoyed the process.  Perhaps there is a larger wholecloth quilt in me yet...

Saturday, June 19, 2010

Inspiration


Last year I did the online Quilt Whisperer course through MQ Resource which I found to be a fabulous course.  The material covered included mainly quilting design and taught me to look at everyday items in a different light.  I now tend to look at the detail in items around me and am amazed at the inspiration for quilting designs that it can provide.  I am currently travelling through Europe and am finding this even more so.  I would like to share some of these inspirational photos with you.


With limited internet time, I have not been able to touch up the photos.  Enjoy!


Friday, June 11, 2010

Den Haan en Wagenmakers - Amsterdam

Today I was fortunate enough to visit the beautiful patchwork shop Den Haan en Wagenmakers in Amsterdam. Den Haan en Wagenmakers are a Dutch Reproduction fabric company known in English as Dutch Quilts. They make an amazing range of absolutely beautiful reproduction fabrics – check out their website at http://www.dutchquilts.com/

The shop is located in a traditional Amsterdam building and as you step inside you find a room swathed from floor to ceiling in seemingly every style of Dutch fabric available. There are many quilts on display, both antique quilts as well as quilts made from the reproduction fabrics.  I was again met by extremely friendly and helpful staff who were happy for me to take photos.


I bought a gorgeous little book called “Amsterdam Made By Hand” which showcases the artisans of Amsterdam with beautiful photography.

Of course I was not able to resist their fabrics. I fell in love with the antique Tree of Life quilt and decided I needed to make a quilt with a tree of life panel. Below is a picture of my purchases.


Amsterdam was wonderful - it is a beautiful city and the day was rounded off beautifully with my visit to Den Haan en Wagenmakers.